Install the Genlook try-on button on your Shopify theme and customize the button, the try-on modal, and shopper limits.
The Genlook widget has two parts in your Shopify theme:
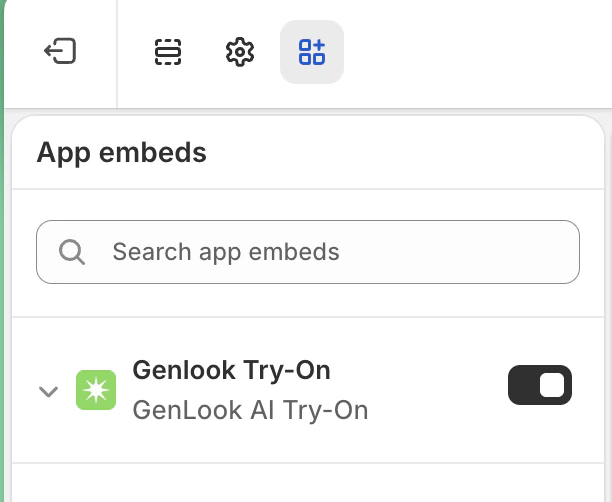
The Genlook Try-On app embed. It loads the Genlook SDK and your store-level configuration on every page. The try-on button does not work without it.
The Genlook Try-On Button app block. It renders the actual button on your product pages, and it is where you style the button in the theme editor.
Everything else (the look of the try-on modal, shopper limits, email collection) is configured inside the Genlook app, not in the theme editor. This page covers all three layers.
In your Shopify admin, go to Online Store > Themes and click Customize on your active theme. Open App embeds at the bottom of the left sidebar, find Genlook Try-On, and toggle it on.
Enable the Genlook Try-On app embed in the theme editor
2
Add the Genlook Try-On Button block
Still in the theme editor, use the dropdown at the top to open a Products template (for example, Default product). In the left sidebar, click Add block inside the product information section and select Genlook Try-On Button.
Make sure you are editing a product template. The block only renders on product pages.
3
Position the button
Drag the block to where shoppers decide whether to buy. Right above or below the Add to cart button drives the highest engagement in our data.
4
Save
Click Save. If your store uses several product templates, repeat for each template that should show the button.
If you add the block but forget the app embed, the button cannot work. In the theme editor Genlook shows a notice (“Enable the Genlook app embed…”) in that case, and on your live store the dead button hides itself automatically.
Target .genlook-button, .genlook-button:hover, or .genlook-try-on-button for anything the settings do not cover. Example: .genlook-button { background: #FF6AA0 !important; }
A high-contrast color plus a recognizable icon (Sparkles or Camera) makes the button noticeably more clicked. If the settings do not get you all the way to your brand look, the Custom CSS field will; and if you would rather use your own markup entirely, see the custom button guide.
The modal your shoppers see is configured in the Genlook app under Widget Design, so it applies store-wide without touching your theme:
Theme: override the widget primary color used inside the modal (loaders, action buttons).
Behavior: show a remaining try-ons counter, and choose the result page action button (Go to product page or Add to cart).
Copy: override the header title (default “Try It On”), the subtitle (default “See how it looks on you”), and add upload instructions shown above the photo picker (for example, “Please upload a full-body photo”). Grammar Gender adjusts phrasing for gendered languages such as Hebrew or Arabic.
Changes save instantly and apply to every product page. Developers can additionally override any of these fields on a single page; see where the widget reads its settings.
Email Collection Step: ask shoppers for their email before or after their try-on (or never). Collected emails land in a Shopify segment and your integrations.
Generation Limits: cap try-ons per shopper per day or week.
Monthly Generation Cap: hard ceiling on total try-ons per month, so a viral product cannot surprise you on billing.
Data Retention: how long shopper photos are kept so returning shoppers can skip re-uploading.
Customer Access: restrict try-on to logged-in customers.
Default product image: choose which product image the AI uses by default.
Watermark and Language Settings round out the list.
The button only appears on products where try-on is enabled. In the Genlook app, open Manage:
Toggle Enable try-on on all products to cover your whole catalog, or
use the Collections and Products tabs to enable specific items. Enabling a collection covers every product in it, including products you add later. The Excluded tab removes individual products from an otherwise enabled collection.
Start with a handful of best-sellers or a new drop, check the results, then roll out wider.
The three usual causes: the app embed is off, the block is missing from the template, or the product is not enabled in Manage. The troubleshooting guide covers these and the rarer ones step by step.